Laravel Install on Windows IIS
This post documents installing PHP 7, PHP Manager and Laravel 5.3 on Internet Information Services (IIS) Manager version 10 which ships with Windows 10 Pro. This Laravel Installation will also be configured to connect to a SQLite database.
Internet Information Services (IIS) Manager
IIS needs to be installed, open the Windows Features dialog to check the installation. One way to do this is by selecting the start button and type Windows Features to bring up a list where “Turn Windows features on or off” can be selected. Another way to get to this Control Panel app is Windows + R key combination and run appwiz.cpl. Turn Windows features on or off link should be in the upper left panel.
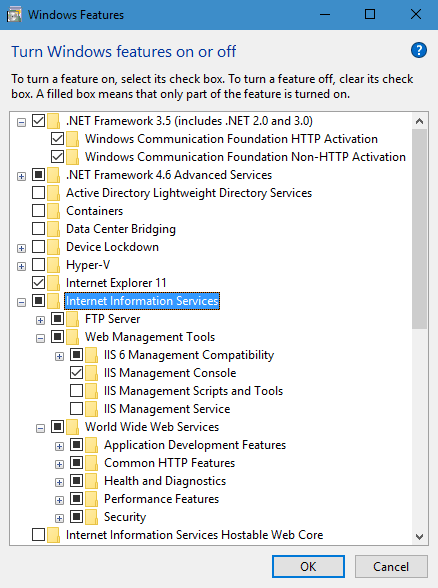
Windows Features
Notice that under .NET Framework 3.5 that both Windows Communication Foundation features are enabled. This may be needed in order for a successful install of PHP Manager. Installation of PHP Manager for IIS requires .NET 3.5 to work properly.
PHP and PHP Manager
Install PHP 7 for Windows using the Microsoft Web Platform Installer. It’s an easy way to get both PHP and the PHP Manager installed and takes some of the guess work out of getting PHP up and running on Windows and IIS.
If PHP Manager Fails to install after confirming that .NET 3.5 is installed and enabled, this is likely due to the installer throwing an error when checking the IIS version. Change the W3SVC MajorVersion value to 7 (decimal) in the registry. After the install is completed, change the value back to 10. More info is available at the PHP Manager - Refuses to install for WTP10 view issue page.
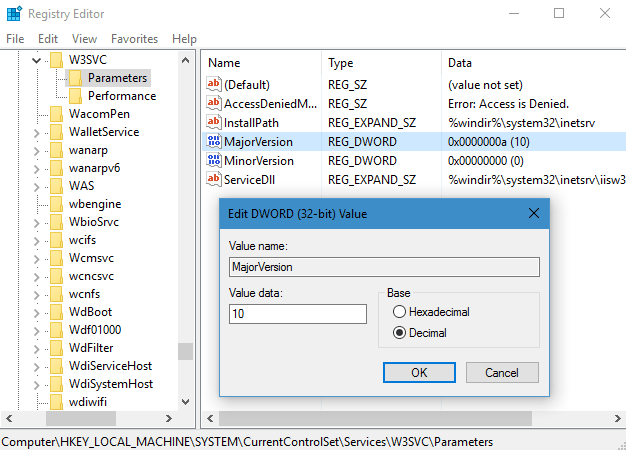
[HKEY_LOCAL_MACHINE\SYSTEM\CurrentControlSet\Services\W3SVC\Parameters]
* YMMV, I am not responsible if you hose your system when editing the registry.
PHP Extensions
In the Internet Information Services (IIS) Manager, Open PHP Manager and select the Enable or disable an extension link. Ensure that the extensions needed for Laravel are enabled. If you want to be able to connect to a SQLite database, enable the php_sqlite3.dll PHP extension. The figure below shows the PHP extensions I have enabled for a working Laravel 5 installation.
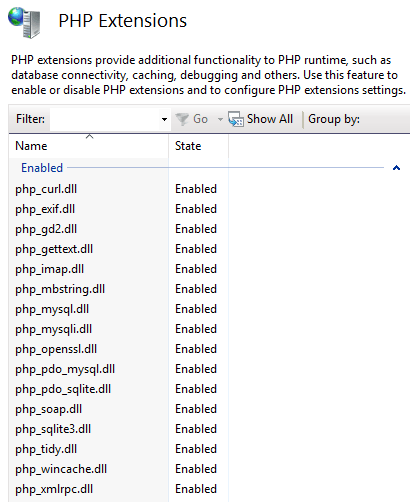
PHP Manager - PHP Extensions
Composer for Windows
Download and run Composer-Setup.exe Windows Installer. The installer will download Composer and set up the PATH environment variable.
Using the Windows Command Prompt, make sure Composer for Windows is installed by running the composer –version command.
composer --version
Git for Windows
Git for Windows is needed so Composer for Windows can download packages. During the installation process, Adjusting your PATH environment, make sure the option, Use Git from the Windows Command Prompt is enabled.
Using the Windows Command Prompt, make sure Git for Windows is installed by running the git --version command.
git --version
Create Laravel Project
Bring up the Adminstrator Command Prompt. One way to do this is by selecting the start button and type command to bring up a list where “Command Prompt” can be selected. Right click on Command Prompt and select Run as administrator .
cd c:/intepub

composer create-project laravel/laravel laravel "5.3.*"
Add Website
Open Internet Information Services (IIS) Manager. Right click on the server and select Add Website. Fill out the form as follows:
Site name: Laravel
Application pool: DefaultAppPool
Physical path: C:\inetpub\laravel\public
Host name: laravel.win
Select “Test Settings” and then “OK” if successful.
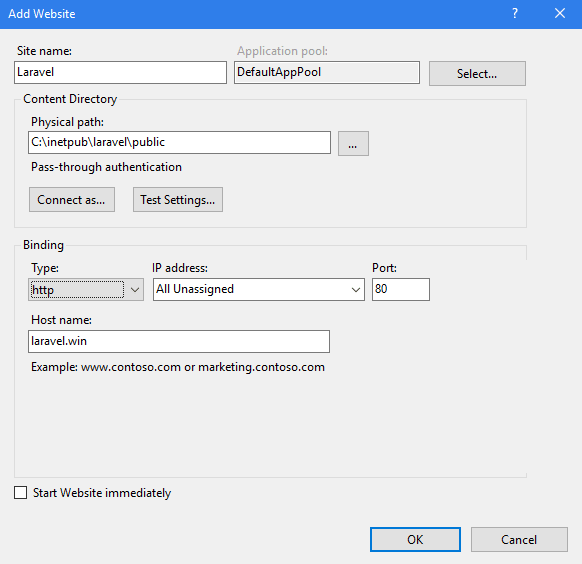
IIS - Add Website
Hosts Mapping
Since the Host name laravel.win was entered for the website, the hosts file needs to be updated. Open Notepad as an administrator. One way to do this is by selecting the start button and type Notepad to bring up a list where it can be selected. Right click on Notepad and select Run as administrator.
Select File | Open, or Ctrl + O and change the File type from Text Documents (*.txt) to All Files (*.*). Browse to C:\Windows\System32\drivers\etc and select the hosts file. Add an entry to map localhost to laravel.win as follows.
hosts
127.0.0.1   localhost
127.0.0.1   laravel.win
Laravel Storage Permissions
In File Explorer, right click on the storage folder in C:\inetpub\laravel and select Properties. Under the Security tab, grant full control of the storage folder to IUSR as shown in the figure below.
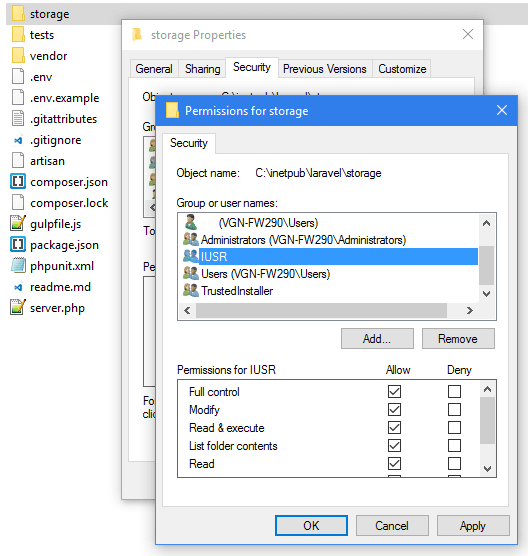
Permissions for storage
Laravel web.config
Since IIS does not have an .htaccess file like Apache, create a web.config file in C:\inetpub\laravel\public as follows. *
web.config
<configuration>
    <system.webServer>
        <defaultDocument>
            <files>
                <clear />
                <add value="index.php" />
                <add value="default.aspx" />
                <add value="Default.htm" />
                <add value="Default.asp" />
                <add value="index.htm" />
                <add value="index.html" />
            </files>
        </defaultDocument>
        <rewrite>
            <rules>
                <rule name="Imported Rule 1" stopProcessing="true">
                    <match url="^(.*)/$" ignoreCase="false" />
                    <conditions>
                        <add input="{REQUEST_FILENAME}" matchType="IsDirectory" ignoreCase="false" negate="true" />
                    </conditions>
                    <action type="Redirect" redirectType="Permanent" url="/{R:1}" />
                </rule>
                <rule name="Imported Rule 2" stopProcessing="true">
                    <match url="^" ignoreCase="false" />
                    <conditions>
                        <add input="{REQUEST_FILENAME}" matchType="IsDirectory" ignoreCase="false" negate="true" />
                        <add input="{REQUEST_FILENAME}" matchType="IsFile" ignoreCase="false" negate="true" />
                    </conditions>
                    <action type="Rewrite" url="index.php" />
                </rule>
            </rules>
        </rewrite>
        <httpErrors errorMode="Detailed" />
    </system.webServer>
</configuration>
* The rewrite rule definitions in the web.config require the URL Rewite 2.0 extension. For easy installation, use the Free Web Platform Installer.
Laravel SQLite Database
Create a SQLite database * in C:\inetpub\laravel\database. Edit C:\inetpub\laravel\.env database values to configure the database connection.
.env
DB_CONNECTION=sqlite
DB_HOST=127.0.0.1
DB_PORT=3306
DB_DATABASE=database/laravel.sqlite
DB_USERNAME=
DB_PASSWORD=
* DB Browser for SQLite is an open source, freeware tool used to create, design and edit SQLite database files.
Restart IIS
In an Administrative Command Prompt, restart IIS so all of the changes get applied.
iisreset /restart
In IIS, make sure that the Larvel web site has been started. If the W3SVC service is not running, it can be started with the following command.
net start w3svc
Once all is said and done, load http://laravel.win in a web browser. Laravel 5.3 default page should look similar to the screen shot below.
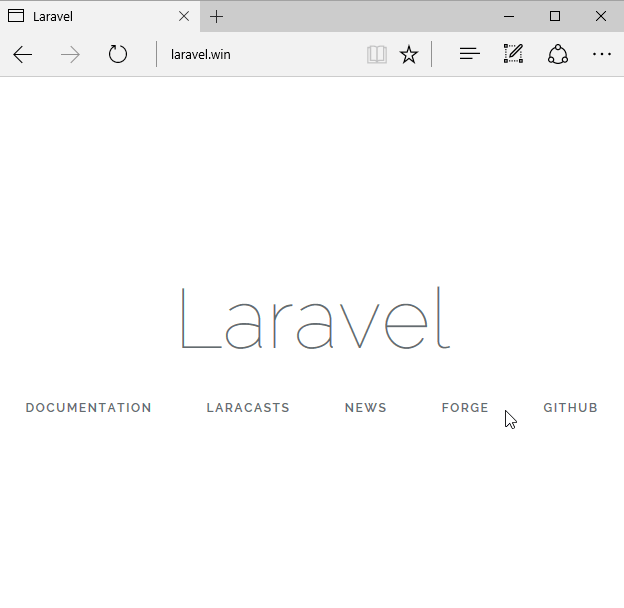
Laravel 5.3
