Laravel JWT Auth with Vue.js
This post documents using Laravel to build JSON Web Token based authentication with a Vue.js 1.0 user interface. UPDATE: vue.js 2.0 version published.
A fresh install of Laravel 5.2 for local development is required. Head over to the Laravel 5.2 docs to get setup with Composer and Laravel as needed. This post contains some info on how I installed Laravel 5.2 on Windows. Once Laravel 5.2 is installed, the database created and the .env file updated to connect to it, run the migration to create the users table.
php artisan migrate
User Model
One of the first things I like to do is create a Models folder and move the User model into it. To organize models within their own directory, start by creating a folder named Models in the app directory and move the User model into it.
mkdir app/Models

mv app/User.php app/Models
Edit app/Models/User.php, change the App namespace to App\Models.
User.php
<?php

namespace App\Models;

use Illuminate\Foundation\Auth\User as Authenticatable;

class User extends Authenticatable
{
    ...
Throughout this tutorial you will encounter an ellipsis
...in the code examples. These are not a part of the code and are there only to denote code that is being skipped and not applicable to the example. To view the entire file, examine the source code.
Edit, config/auth.php. Update the authentication drivers user provider for the App\Models\User namespace change as follows.
auth.php
'providers' => [
    'users' => [
        'driver' => 'eloquent',
        'model' => App\Models\User::class,
    ],

    ...
Laravel Elixir Vueify
Using NPM, install the dependencies including laravel-elixer and gulp that should already be defined in the package.json file.
npm install
Install the Laravel Elixir and the Browserify Vueify plugin wrapper, laravel-elixir-vueify. This node package also includes vue.js.
For Laravel Elixer 5
npm install laravel-elixir-vueify@1.0.6 --save-dev
Laravel Elixir is a build tool wrapper for Gulp. To use laravel-elixir-vueify, require laravel-elixir-vueify and update the elixir call with mix.browserify in the gulpfile.js as follows.
REPLACE
elixir(function(mix) {
    mix.sass('app.scss');
});
WITH
require('laravel-elixir-vueify');

elixir(function(mix) {
    mix.browserify('app.js');
    mix.sass('app.scss');
});
Create a resources/assets/js folder for the JavaScript.
mkdir resources/assets/js
Create a resources/assets/js/app.js JavaScript file.
touch resources/assets/js/app.js
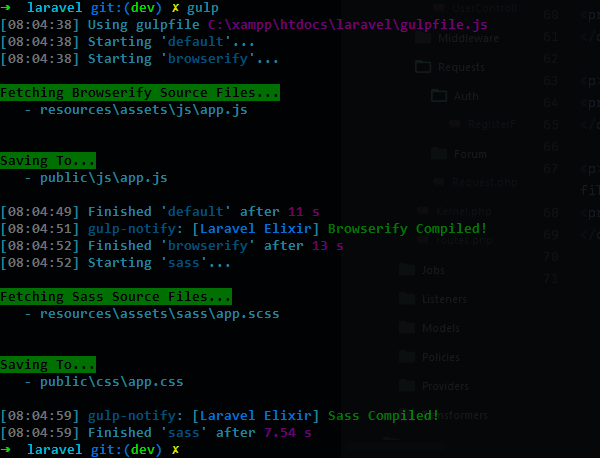
Test the gulp build. A browserified app.js file that includes an external source map file should get compiled and written to public/js/app.js. The pre-existing app.scss Sass file should also get compiled.
gulp

Default Gulp task output
Vue Router and Components
Install the router for Vue.js.
npm install vue-router@0.7.13 --save-dev
The npm install vue-router command above has been updated to install the version supported by the 1.x version of
vue.js. This is thevue.jsversion installed withlaravel-elixir-vueify@1.0.6.
Create a resources/assets/components folder and add an empty App.vue, Dashboard.vue, Home.vue, Register.vue and Signin.vue component.
mkdir resources/assets/components

touch resources/assets/components/App.vue

touch resources/assets/components/Dashboard.vue

touch resources/assets/components/Home.vue

touch resources/assets/components/Register.vue

touch resources/assets/components/Signin.vue
Add the following code to the empty App.vue file which will be the base layout component.
App.vue
<template>
    <div class="panel panel-default">
        <div class="panel-heading">
            <nav>
                <ul class="list-inline">
                    <li><a v-link="{ name: 'home' }">Home</a></li>
                    <li class="pull-right">
                        <a v-link="{ name: 'register' }">Register</a>
                    </li>
                </ul>
            </nav>
        </div>
        <div class="panel-body">
            <router-view></router-view>
        </div>
    </div>
</template>
Add the following code to the empty Home.vue file. The content in this template will populate the App.vue router-view element by default.
Home.vue
<template>
    <h1>Laravel 5</h1>
</template>
Add the following code to the empty Register.vue file for the user account creation form.
Register.vue
<template>
    <div class="alert alert-danger" v-if="error && !success">
        <p>There was an error, unable to complete registration.</p>
    </div>
    <div class="alert alert-success" v-if="success">
        <p>Registration completed. You can now sign in.</p>
    </div>
    <form autocomplete="off" v-on:submit="register" v-if="!success">
        <div class="form-group" v-bind:class="{ 'has-error': error && response.username }">
            <label for="name">Name</label>
            <input type="text" id="name" class="form-control" v-model="name" required>
            <span class="help-block" v-if="error && response.name">{{ response.name }}</span>
        </div>
        <div class="form-group" v-bind:class="{ 'has-error': error && response.email }">
            <label for="email">E-mail</label>
            <input type="email" id="email" class="form-control" placeholder="gavin.belson@hooli.com" v-model="email" required>
            <span class="help-block" v-if="error && response.email">{{ response.email }}</span>
        </div>
        <div class="form-group" v-bind:class="{ 'has-error': error && response.password }">
            <label for="password">Password</label>
            <input type="password" id="password" class="form-control" v-model="password" required>
            <span class="help-block" v-if="error && response.password">{{ response.password }}</span>
        </div>
        <button type="submit" class="btn btn-default">Submit</button>
    </form>
</template>
Add the following code to the empty app.js file to require vue, the vue-router, import vue components, setup the router. Export Vue and the router to allow modules to import them.
app.js
var Vue = require('vue');
var VueRouter = require('vue-router');

import App from '../components/App.vue';
import Dashboard from '../components/Dashboard.vue';
import Home from '../components/Home.vue';
import Register from '../components/Register.vue';
import Signin from '../components/Signin.vue';

Vue.use(VueRouter);

export default Vue;
export var router = new VueRouter

router.map({
    '/': {
        name: 'home',
        component: Home
    },
    '/register': {
        name: 'register',
        component: Register
    }
});

router.start(App, '#app');
Web Page
Edit the resources/views/welcome.blade.php template.
Replace the entire contents of the file with this markup.
welcome.blade.php
<!DOCTYPE html>
<html>
<head>
    <meta charset="utf-8">
    <meta name="csrf-token" content="{!! csrf_token() !!}">
    <title>Laravel</title>

    <link href="https://maxcdn.bootstrapcdn.com/bootstrap/3.3.7/css/bootstrap.min.css" rel="stylesheet" integrity="sha384-BVYiiSIFeK1dGmJRAkycuHAHRg32OmUcww7on3RYdg4Va+PmSTsz/K68vbdEjh4u" crossorigin="anonymous">

</head>
<body>
    <div class="container">
        <div id="app"></div>
    </div>
    <script src="/js/app.js"></script>
</body>
</html>
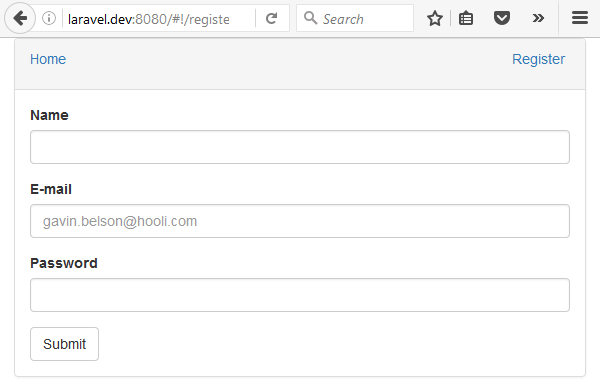
Now is a good time to test that everything builds and you have a Bootstrap styled page with with links to Home and Register in a horizontal navigation bar and a content panel under it with “Laravel 5” heading text. Select the Register link to diplay the form in the content panel.
gulp

New User Registration Form
Next, the registration form needs to be setup to post the data.
Vue Resource
The Vue.js resource plugin provides services for making web requests and handling responses. Install the resource plugin for Vue.js
npm install vue-resource --save-dev
Update resources/js/app.js to require the vue-resource plugin after vue and the vue-router. Also add the Vue.http.headers and Vue.http.options.root url. Laravel VerifyCsrfToken middleware will check for the X-CSRF-TOKEN request header. To make this token available to the client side script, it is being stored in a meta tag via resources/views/welcome.blade.php. The Authorization header is needed for JWT auth which will be added with the sign-in form later.
app.js
var Vue = require('vue');
var VueRouter = require('vue-router');
var VueResource = require('vue-resource');

Vue.http.headers.common['X-CSRF-TOKEN'] = document.getElementsByName('csrf-token')[0].getAttribute('content');
Vue.http.headers.common['Authorization'] = 'Bearer ' + localStorage.getItem('id_token');
Vue.http.options.root = 'http://laravel.dev:8080';

...
Create a resources/js/auth.js JavaScript file.
touch resources/assets/js/auth.js
Add the following code to auth.js to handle the API request when the register form is submitted.
auth.js
import Vue from './app.js';
import {router} from './app.js';

export default {
    user: {
        authenticated: false,
        profile: null
    },
    register(context, name, email, password) {
        Vue.http.post(
            'api/register',
            {
                name: name,
                email: email,
                password: password
            }
        ).then(response => {
            context.success = true
        }, response => {
            context.response = response.data
            context.error = true
        })
    }
}
Add the following script to the bottom of the Register.vue file to handle the register form submit.
Register.vue
...

</template>

<script>
import auth from '../js/auth.js';

export default {
    data() {
        return {
            name: null,
            email: null,
            password: null,
            success: false,
            error: false,
            response: null
        }
    },
    methods: {
        register(event) {
            event.preventDefault()
            auth.register(this, this.name, this.email, this.password)
        }
    }
}
</script>
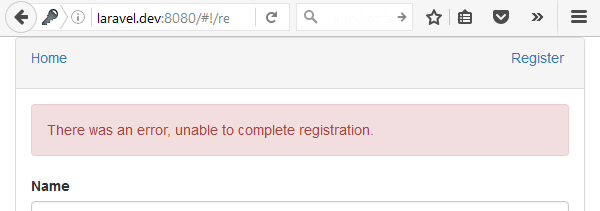
Run gulp then fill out and submit the new user registration form. You should get a error message since the api/register route and respective endpoint has not yet been created.

New User Registration Form Error
The next page covers Form Request Validation, API authorization with JWT Auth, User endpoint and Sign in.
