Visual Studio MVC Bourbon Web App
It is now 2015 and with it a new version of Visual Studio that includes tools for Bower front end package management, Node Package Manager (NPM) and the Grunt JavaScript Task Runner. Not surprisingly, Microsoft has its own way of implementing Grunt, Bower and Node Modules in their upcoming Visual Studio debut. You don’t have to wait for Visual Studio 2015. Grunt, Bower, Node Modules and Bourbon can easily be included in a Visual Studio 2012 MVC 4 web application.
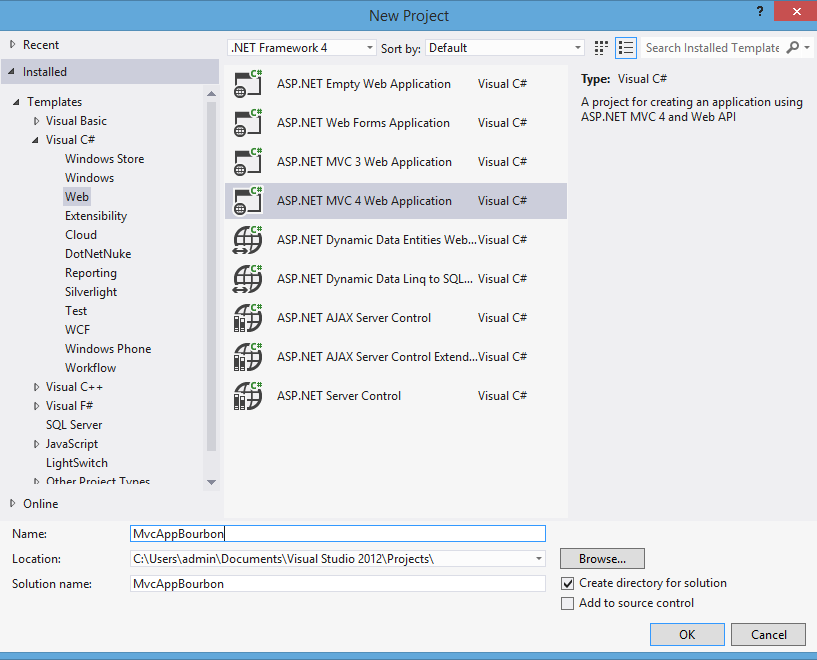
1. Create a New Project

New ASP.NET MVC 4 Web Application – MvcAppBourbon
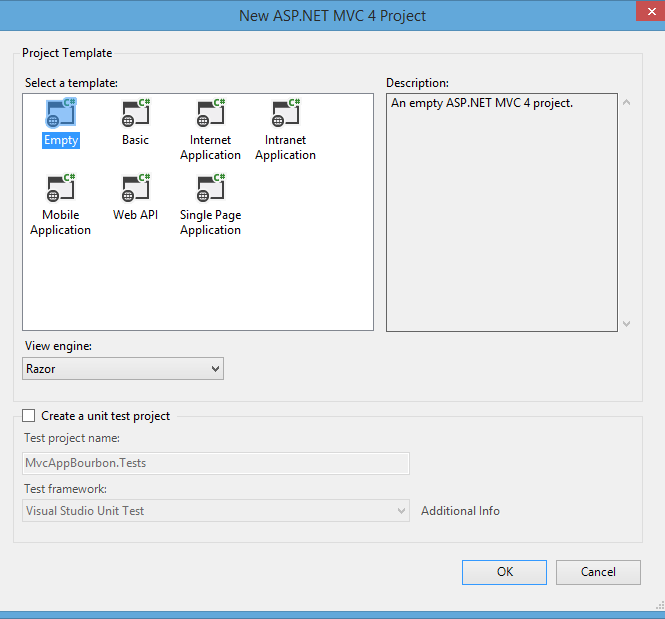
2. Select the Empty Project Template

New ASP.NET MVC 4 Project – Empty Project Template
3. Ruby and Sass 3.3+
To install or update Sass you will need to have Ruby installed. For Windows, you can use the RubyInstaller for Windows. See this post for more info, Compass on Windows. These next step are done using a CLI, Windows PowerShell is what I will be using here. Git for Windows provides BASH emulation which also works great.
Install Sass
Ruby uses Gems to manage its code packages, to install the Sass Ruby Gem, enter gem install sass in the CLI.

Windows PowerShell – Install Sass
4. Node Package Manager (NPM)
Install Node.js
NPM is included with Node.js. The best way to install NPM is to install node. The easiest way to install Node.js for Windows is with the Windows Installer (.msi) avaialble here.
5. Bower
Use NPM to install Bower globally on your system.
Install Bower
# global bower install
npm install -g bower
Change to the directory where you app is located. For me this is: cd ‘~\Documents\Visual Studio 2012\Projects\MvcAppBourbon\MvcAppBourbon’
Install Bourbon
# bourbon install
bower install bourbon
Installed packages are located in the bower_components directory. This is created in the folder which the bower program was executed.
Install Bourbon Neat
Neat is a lightweight semantic grid framework for Sass and Bourbon.
# bourbon neat install
bower install neat
6. Bitters
Install Bourbon Bitters
Bitters jump start projects with a predefined set of basic Sass variables, default element style and project structure. Bitters are not installed with bower since the styles and variables are intended to be customized as needed. Change to the root directory of the app if not already there from bourbon install above. For me this is: cd ‘~\Documents\Visual Studio 2012\Projects\MvcAppBourbon\MvcAppBourbon’
# bourbon bitters install
gem install bitters

# create a directory for sass files and folders
# this is done from within the MvcAppBourbon app root

mkdir sass

# change to the new sass directory
cd sass

# install bitters into the sass folder
bitters install

# navigate back to the MvcAppBourbon app root
cd ../

# create a directory for css files
mkdir css
Bitters files are installed to base/base. In-depth instructions on GitHub.
7. Grunt
Install Grunt
Use NPM to install Grunt’s command line interface (CLI) globally on your system. Then use NPM init to create a package.json that stores node package data for the app. The third command to run, npm install grunt –save-dev installs the latest version of Grunt into the project and adds it to the package.json devDependencies. More info is avaialable here.
# grunt CLI install
npm install -g grunt-cli

# create package.json
npm init

# grunt install to app, updates package.json
npm install grunt --save-dev
Installed npm packages are located in the node_modules directory. This is created in the folder which the npm install program was executed.
Install Grunt Plugins
The Grunt task that handles sass compilation to css when a .scss file is updated and saved is accomplished with these two plugins, grunt-contrib-watch and grunt-contrib-compass.
# grunt-contrib-watch install
npm install grunt-contrib-watch --save-dev

# grunt-contrib-compass install
npm install grunt-contrib-compass --save-dev
Create Gruntfile.js
In Visual Studio > Solution Explorer; Right click MvcAppBourbon; Select: Add > New Item > JavaScript File; Name: Gruntfile.js
Add this JavaScript to the Gruntfile.
Gruntfile.js
'use strict';

module.exports = function(grunt) {
    // Project configuration.
    grunt.initConfig({
        pkg: grunt.file.readJSON('package.json'),
        compass: {
            dist: {
            options: {
                cssDir: 'css/',
                sassDir: 'sass/',
                outputStyle: 'compressed'
            }
            }
        },
        watch: {
            css: {
                files: '**/*.scss',
                tasks: ['compass']
            }
        }
    });

    // Load the plugins.
    grunt.loadNpmTasks('grunt-contrib-compass');
    grunt.loadNpmTasks('grunt-contrib-watch');

    // default task
    grunt.registerTask('default', ['watch']);
}
8. SassyStudio Extension
In Visual Studio 2012, select Tools > Extensions and Updates
Search for and install the SassyStudio extension. This free utility provides a small amount of support for .scss files in Visual Studio. More info
9. Sass
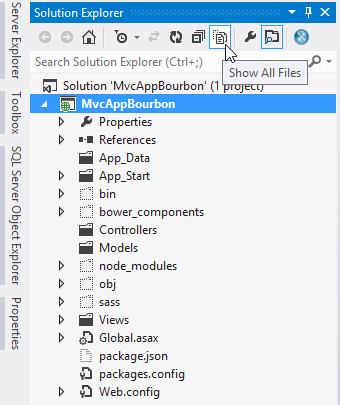
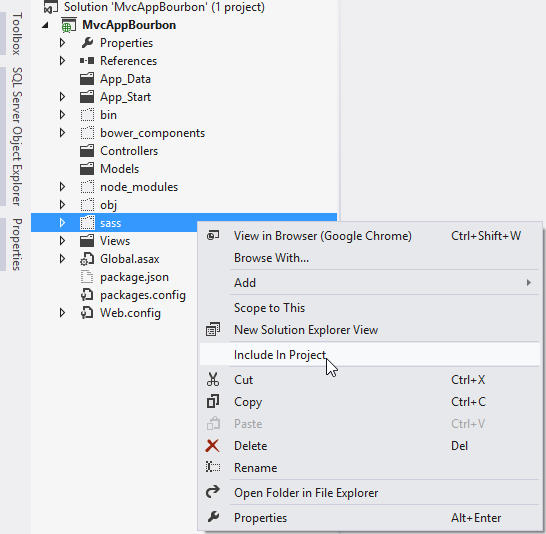
In Visual Studio Solution Explorer; Select Show All Files;

Right click sass > Include In Project;

Open sass/base/_grid-settings.scss and change the import path: @import “neat-helpers” to @import “../../bower_components/neat/app/assets/stylesheets/neat-helpers”.
_grid-settings.scss
//not in Rails
@import "../../bower_components/neat/app/assets/stylesheets/neat-helpers";
Create main.scss
In Visual Studio > Solution Explorer; Right click MvcAppBourbon > sass; Select: Add > New Item > SASS File; Name: main.scss
Add this Sass to the main.scss file to import Bitters (base/base) and Neat. Neat is imported after Bitters.
main.scss
@import "../bower_components/bourbon/app/assets/stylesheets/bourbon.scss";
@import "base/base";
@import '../bower_components/neat/app/assets/stylesheets/neat';
Prior to making anymore Sass edits, in the CLI, load grunt to watch and compile changes.

Windows PowerShell – Grunt
Since we are using Neat, uncomment the grid-settings import in sass/base/_base.scss:
_base.scss
// Neat Settings -- uncomment if using Neat -- must be imported before Neat
@import "grid-settings";
After saving sass/main.scss, the running grunt tasks should should indicate that css/main.css has been written in the CLI and css/main.css should be updated to contain all of the base styles from the bitters import. Refresh Solution Explorer to see the new css.

Windows PowerShell – Grunt Compass
Controller and Views
1. Controller
Create HomeController
- In Visual Studio > Solution Explorer; Right click MvcAppBourbon > Controllers; Select: Add > Controller; Controller name: HomeController.scss Template: Empty MVC controller
2. Views
Create _Layout
-
In Visual Studio > Solution Explorer; Right click MvcAppBourbon > Views; Select: Add > New Folder; Name: Shared
-
Right click MvcAppBourbon > Views > Shared; Select: Add > New Item (Ctrl + Shift + A); Select: MVC 4 Layout Page (Razor); Name: _Layout.cshtml
-
Edit Views/Shared/_Layout.cshtml; In the document head, add a stylesheet link to /css/main.css.
_Layout.cshtml - head
<head>
    <meta name="viewport" content="width=device-width" />
    <title>@ViewBag.Title</title>
    <link rel="stylesheet" href="/css/main.css">
</head>
Create _ViewStart
-
Right click MvcAppBourbon > Views; Select: Add > New Item (Ctrl + Shift + A); Select: MVC 4 Partial Page (Razor); Name: _ViewStart.cshtml
-
Edit Views/_ViewStart.cshtml
_ViewStart.cshtml
@{
    Layout = "~/Views/Shared/_Layout.cshtml";
}
Create Home
-
In Visual Studio > Solution Explorer; Right click MvcAppBourbon > Views; Select: Add > New Folder; Name: Home
-
Right click MvcAppBourbon > Views > Home; Select: Add > New Item (Ctrl + Shift + A); Select: MVC 4 Partial Page (Razor); Name: Index.cshtml
Step 2
Create Sass Module
-
In Visual Studio > Solution Explorer; Right click MvcAppBourbon > sass; Select: Add > New Folder; Name: modules
-
Right click MvcAppBourbon > sass > modules; Select: Add > New Item > SASS File; Select: MVC 4 Partial Page (Razor); Name: _grid.scss
-
In the CLI, load grunt to watch and compile sass files.
-
Navigate to refills.bourbon.io/#grid-items; Copy the markup code from the left pane into the Home View: /Views/Home/Index.cshtml; Copy the Sass code from the right pane into the grid module: /sass/modules/_grid.scss;
-
Append @import “modules/grid”; to the end of /sass/main.scss
-
In Visual Studio > Debug > Start Debugging (F5); A browser should open with the grid displayed.
