
WordPress from Development to Production using Docker
This post will cover how to use Docker for a local WordPress development environment and how to deploy it to an Ubuntu Linux server running docker.
What you will need.
- Docker
- VPS with Docker (for prod deployment)
- WordPress
The first step is to get your local development environment set up for your WordPress site. There are quite a few ways I have setup this environment in the past. For the last year or so, I’ve been using Wodby’s Docker-based WordPress Stack with its many options.
Using git, clone docker4wordpress into a site folder. For example mysite.
git clone https://github.com/wodby/docker4wordpress.git mysite
Update the .env file, for example:
PROJECT_NAME=mysite
PROJECT_BASE_URL=dev.docker.mysite.com
Update your systems hosts file, for example:
127.0.0.1 dev.docker.mysite.com
Delete docker-compose.override.yml as it’s used to deploy vanilla WordPress
Download WordPress and uncompress it into the site folder so you end up with a wordpress folder. For example mysite/wordpress.
Optionally, you could download and extract WordPress using the CLI, for example:
cd mysite
wget http://wordpress.org/latest.tar.gz
tar xfz latest.tar.gz
Docker Compose
Update the docker-compose.yml volume paths to mount the codebase to ./wordpress instead of the root of the site folder. This step is needed for the build configuration. For example, for both of these services nodes, nginx and php, replace ./:/var/www/html with ./wordpress:/var/www/html.
...
    volumes:
      - ./wordpress:/var/www/html
Create a named volume definition to persist the mysql data. At the bottom of the docker-compose.yml file, uncomment and update the volumes node. For example, replace #volumes: with the following:
volumes:
  mysql:
Update the mariadb service to use the named mysql volume. For example, under the mariadb services node, uncomment and update the volumes node. For example:
services:
  mariadb:

    ...

    volumes:
      - mysql:/var/lib/mysql
With Docker running, from the site directory, e.g., mysite, run docker-compose up -d to start containers.
cd mysite

docker-compose up -d
If you’re in Windows and get the following error:
ERROR: for traefik Cannot create container for service traefik: Mount denied: The source path \\\\var\\\\run\\\\docker.sock:/var/run/docker.sock is not a valid Windows path
This worked for me using Cygwin. Before running docker-compose up -d, run export COMPOSE_CONVERT_WINDOWS_PATHS=1. For PowerShell, use $Env:COMPOSE_CONVERT_WINDOWS_PATHS=1 More info: github.com/docker/for-win/issues/1829
Now you’re ready to load the site in a browser, http://dev.docker.mysite.com:8000.
The WordPress install page should appear. After selecting your language, on the following screen, if using the default settings in .env file, enter wordpress for Database Name, Username and Password. The Database Host value is the service name defined in the docker-compose.yml, e.g., mariadb.
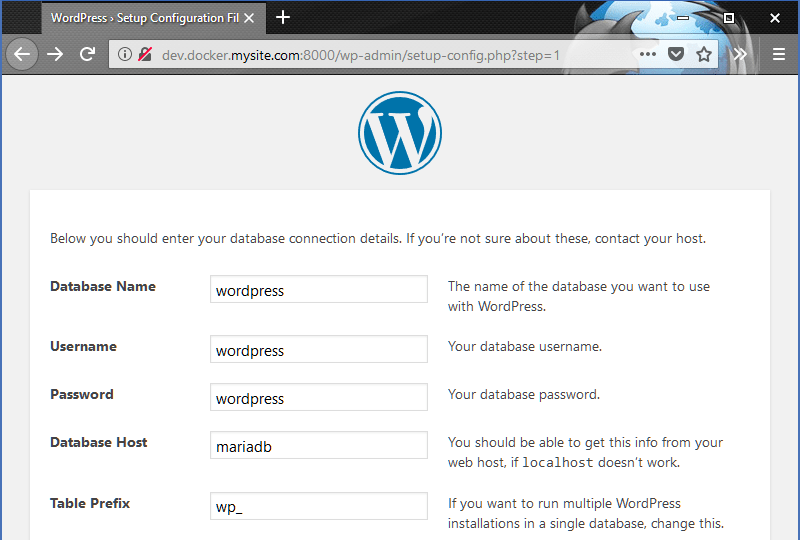
WordPress Install - Database Configuration
Custom Theme
To demonstrate getting a custom theme into the build, let’s make a copy of twentyseventeen and customize it.
cp -r wordpress/wp-content/themes/twentyseventeen wordpress/wp-content/themes/mytheme/
We’re just gonna make a small change to the site title text to show what you can do to make the font size flexible for the default below desktop viewport width.
Edit mytheme/style.css. Under Layout, add font-size: 5vw below the existing font-size rules. For example.
style.css
.site-title {
    ...

    font-size: 24px;
    font-size: 1.5rem;
    font-size: 5vw;
Login to the site and activate mytheme to see the change to the site title font size when you adjust the width of the browser below 768 pixels wide.
Plugins
To demonstrate the inclusion of plugins in the docker build, install a plugin that will be included in the codebase. For example, I like the Yoast SEO plugin. Instead of installing it using the dashboard, download and extract it. Copy the wordpress-seo folder into the wordpress/wp-content/plugins folder. You can verify the installation by logging into the site dashboard and inspecting the plugins page.
Docker Image
The docker image we build for staging and production will be based off the official WordPress image and will only need our themes, plugins and any other changes from the development environment. Create or download this Dockerfile into your site folder. The FROM instruction in this file is set to use the official WordPress base image. You should update this as needed to use the latest version of the image.
For example, to download the Dockerfile using wget
cd mysite
wget https://raw.githubusercontent.com/jimfrenette/docker4wordpress/master/Dockerfile.sh
Dockerfile
## https://github.com/docker-library/wordpress
FROM wordpress:4.9.6-php7.2-apache

## PHP extensions
## update and uncomment this next line as needed
# RUN docker-php-ext-install pdo pdo_mysql

## custom directories and files
## copy them here instead of volume
## /var/www/html/
## wordpress docker-entrypoint.sh runs
## chown -R www-data:www-data /usr/src/wordpress
COPY ./build/ /usr/src/wordpress/
I created some build scripts to accept some parameters and copy files from the development environment into a build folder for the Dockerfile. Update the script as needed, setting the THEME variable to match the folder name of your custom WordPress theme. e.g., THEME = "mysite". Use the appropriate script for your environment:
If you’re in Windows, use the docker-build.ps1 PowerShell script.
If you’re in OS X or Linux, use the docker-build.sh bash script.
Download the build script into your site folder and run it. For example:
cd mysite

# download build script
wget https://raw.githubusercontent.com/jimfrenette/docker4wordpress/master/docker-build.sh

# if initial run,
# set script as executable
chmod +x docker-build.sh

# run
./docker-build.sh
This image shows running the docker-build shell script in the VS Code integrated terminal. Note the file explorer in the left pane contains the docker/stage/mysite-4.9.6-1.0.tar file that was created.

Run docker-build shell script in VS Code
Deployment
After running the build script, a saved docker image .tar file should exist in the prod or stage folders. One way to deploy the image is to copy the .tar file to the server using scp and load it.
With example Ubuntu user gilfoyle, use scp from the stage folder.
# upload image
cd docker
scp mysite.tar gilfoyle@0.0.0.0:/home/gilfoyle/
Load the Docker image on the server.
# load image
ssh gilfoyle@0.0.0.0
docker load -i mysite.tar
- For an example of how to setup Docker on an Ubuntu server, I have created a blog post on the subject, VPS Proof of Concept for Docker and Traefik.
Part two of this post includes stage and prod docker-compose.yml, migrating data, etc.
Part 1 of 2 in the WordPress from Development to Production using Docker series.
WordPress from Development to Production using Docker Part II