
CSS Flexbox with Sidebars Toggle
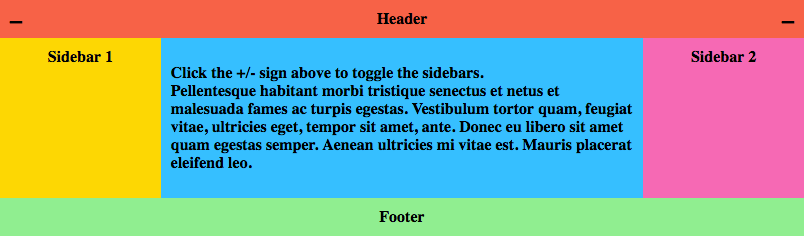
This post documents how to create a fully responsive flexbox content layout that contains a pure CSS open/close toggle for the left and right sidebars. The CSS is built from Sass using Webpack with Autoprefixer. For development, a Webpack Dev Server is included.
Features
- Pure CSS Sidebar toggle
- Sass CSS preprocessor
- PostCSS Autoprefixer
- CSSnano
- Webpack 4
- Webpack Dev Server
demo and edit this code in our online sandbox
Getting Started
Create an index.html file in the root of the project with the following HTML. This markup creates a layout with header, content and footer containers. The content container includes aside containers for the sidebars and checkbox inputs to toggle the sidebars open or closed.
index.html
<!DOCTYPE html>
<html lang="en">
<head>
    <meta charset="UTF-8">
    <meta name="viewport" content="width=device-width, initial-scale=1.0">
    <meta http-equiv="X-UA-Compatible" content="ie=edge">
    <title>Document</title>
    <link rel="stylesheet" media="all" href="/dist/app.css">
</head>
<body>
    <div class="site">
        <header class="header">Header</header>
        <div class="content">
            <article class="main">
                <p>Pellentesque habitant morbi tristique senectus et netus et malesuada fames ac turpis egestas. Vestibulum tortor quam, feugiat vitae, ultricies eget, tempor sit amet, ante. Donec eu libero sit amet quam egestas semper. Aenean ultricies mi vitae est. Mauris placerat eleifend leo.</p>
            </article>
            <input type="checkbox" id="sidebar-1-toggle">
            <label for="sidebar-1-toggle"></label>
            <aside class="sidebar sidebar-1">
                <div>Sidebar 1</div>
            </aside>
            <input type="checkbox" id="sidebar-2-toggle">
            <label for="sidebar-2-toggle"></label>
            <aside class="sidebar sidebar-2">
                <div>Sidebar 2</div>
            </aside>
        </div>
        <footer class="footer">Footer</footer>
    </div>
</body>
</html>
Using Emmet, which is built into VS Code, you can create the index.html content by entering an exclamation mark on the first line then select the tab key.
Create a src/sass folder in the project. And in the sass folder create a style.scss file with the following css.
style.scss
body {
  min-width: 400px;
}

.site {
  max-width: 1440px;
  margin: 0 auto;
  position: relative;
  font-weight: bold;
  text-align: center;
}

.content {
  display: flex;
}

.header {
  background: tomato;
  padding: 10px;
}

.footer {
  background: lightgreen;
  padding: 10px;
}

.main {
  flex: 1;
  min-width: 0;
  text-align: left;
  background: deepskyblue;
  padding: 10px;
}

.sidebar > div {
  padding: 10px;
}

.sidebar-1 {
  background: gold;
}

.sidebar-2 {
  background: hotpink;
}

@media all and (max-width: 800px) {
  .content {
    flex-wrap: wrap;
  }
  .main {
    flex: 1 1 100%;
  }
}

@media all and (min-width: 801px) {
  .sidebar-1 { order: 1; }
  .main    { order: 2; }
  .sidebar-2 { order: 3; }
}
Webpack
Webpack is going to be used to process the Sass as its saved into CSS and serve the HTML locally.
- Pre-requisite – the Webpack module bundler example here requires Node.js.
Use your favorite Node.js bash command line to setup the project. Navigate to the project root and enter npm init. Accepting the defaults is fine.
npm init
Now we’re ready to install Webpack and other devDependencies into our project. In case you’re wondering, the projects node_modules folder is where all of these packages get installed. For more information, visit npmjs.com and/or watch this introduction to npm video.
Install Webpack and its Command Line Interface.
npm install -D webpack webpack-cli
Create a config folder for the webpack configuration files.
In this config folder, there will be three webpack configuration files, base.config.js, dev.config.js and prod.config.js.
First, create the config/base.config.js which holds the configuration common to both dev and production.
base.config.js
const path = require('path');
const MiniCssExtractPlugin = require("mini-css-extract-plugin");

module.exports = {
  context: path.resolve(__dirname, '../src'),
  entry: {
    app: './js/index.js'
  },
  plugins: [
    new MiniCssExtractPlugin
  ],
  module: {
    rules: [
      {
        test: /\.(css|scss)$/,
        use: [
          MiniCssExtractPlugin.loader,
          'css-loader',
          {
            loader: 'postcss-loader' },
          {
            loader: 'sass-loader' }
        ]
      },
      {
        test: /\.js$/,
        exclude: /node_modules/,
        use: 'babel-loader'
      }
    ]
  }
}
The mini-css-extract-plugin extracts the css from the bundle and outputs the css file after the loaders process the sass.
Install the plugin and loaders for the base configuration.
npm install -D mini-css-extract-plugin

npm install -D babel-loader @babel/core @babel/preset-env

npm install -D autoprefixer style-loader css-loader postcss-loader

npm install -D node-sass sass-loader
Next, create the config/dev.config.js.
dev.config.js
const baseConfig = require('./base.config.js');
const merge = require('webpack-merge');
const writeFilePlugin = require('write-file-webpack-plugin');

module.exports = merge(baseConfig, {
  devtool: 'eval-source-map',
  plugins: [
    new writeFilePlugin()
  ]
});
Install the webpack-dev-server, write-file-webpack-plugin and webpack-merge.
npm install -D webpack-dev-server write-file-webpack-plugin

npm install -D webpack-merge
The write-file-webpack-plugin, like the mini-css-extract-plugin, outputs the css file for the in-memory webpack dev server. However, this plugin does not do anything unless it is used with the webpack-dev-server.
We are using webpack-merge to combine our separate webpack configuration modules.
We need a small configuration file for postcss. In the project root, create a file named postcss.config.js.
postcss.config.js
module.exports = {
  plugins: [
    require('autoprefixer')
  ]
}
Create the config/prod.config.js.
prod.config.js
const baseConfig = require('./base.config.js');
const merge = require('webpack-merge');
const OptimizeCSSAssetsPlugin = require("optimize-css-assets-webpack-plugin");
const UglifyJsPlugin = require("uglifyjs-webpack-plugin");

module.exports = merge(baseConfig, {
  optimization: {
      minimizer: [
        new OptimizeCSSAssetsPlugin({})
      ]
  },
  plugins: [
    new UglifyJsPlugin({
      uglifyOptions: { output: { comments: false } }
    })
  ]
});
Install the optimize-css-assets-webpack-plugin and uglifyjs-webpack-plugin to make our client side assets as small as possible for production.
npm install -D optimize-css-assets-webpack-plugin

npm install -D uglifyjs-webpack-plugin
Supported Browsers
Add a browserslist property to the package.json file to define which vender prefixes to with the generated CSS. In this example, we target browsers greater than 2% according to global usage statistics and Internet Explorer versions greater than 9. [more info]
package.json
{
  "name": "blank",
  "version": "1.0.0",
  "description": "",
  "main": "index.js",
  "browserslist": [
    "> 2%",
    "ie > 9"
  ],

  ...
}
npm-run-script
Add these webpack commands to the scripts property. These npm script commands are what we will run to kickoff the webpack dev server and watch or prod webpack build.
package.json
  ...

  "browserslist": [
    "> 2%",
    "ie > 9"
  ],
  "scripts": {
    "dev": "webpack-dev-server --mode=development --watch --progress --colors --config config/dev.config.js --open",
    "build": "webpack --mode=production --progress --hide-modules --config config/prod.config.js",
    "test": "echo \"Error: no test specified\" && exit 1"
  },

  ...
}
Entrypoint JavaScript
Create a src/js/index.js javascript entrypoint file to import the style Sass for the webpack bundle.
index.js
import '../sass/style.scss'
Sidebar Toggle Sass
Create these three Sass partials for the sidebar toggle, src/sass/_toggle.scss, src/sass/_default-open.scss and src/sass/_default-closed.scss.
This is the _toggle.scss partial imported by the style.scss file.
_toggle.scss
/**
  * Sidebar toggle
  */

// uncomment for default closed sidebars
// @import "default-closed";
// uncomment for default open sidebars
@import "default-open";

/**
  * checkboxes open/close the sidebars
  * #sidebar-1-toggle and #sidebar-2-toggle
  */
  #sidebar-1-toggle, #sidebar-2-toggle {
  display: none;
}

label[for=sidebar-1-toggle],
label[for=sidebar-2-toggle] {
  position: absolute;
  top: 0;
  display: block;
  padding: .25em 10px;
  font-size: 1.5em;
  cursor: pointer;
}

label[for=sidebar-1-toggle] {
  left: 0;
}

label[for=sidebar-2-toggle] {
  right: 0;
}

@media all and (max-width: 800px) {
  label[for=sidebar-1-toggle],
  label[for=sidebar-2-toggle] {
    display: none;
  }
  .sidebar-1,
  .sidebar-2 {
    display: block;
    width: 50%;
  }
}
This is the _default-open.scss partial imported by the _toggle.scss.
_default-open.scss
/**
  * Sidebars open by default
  */

.sidebar {
  width: 20%;
}

label[for=sidebar-1-toggle],
label[for=sidebar-2-toggle] {
  &:after {
    content: '\2013';
  }
}

#sidebar-1-toggle:checked ~ label[for=sidebar-1-toggle],
#sidebar-2-toggle:checked ~ label[for=sidebar-2-toggle] {
  &:after {
    content: '+';
  }
}

#sidebar-1-toggle:checked ~ .sidebar-1,
#sidebar-2-toggle:checked ~ .sidebar-2 {
  display: none;
  width: 0;
}
This is the _default-closed.scss partial imported by the _toggle.scss file when uncommented.
_default-closed.scss
/**
  * Sidebars closed by default
  */

.sidebar {
  display: none;
}

label[for=sidebar-1-toggle],
label[for=sidebar-2-toggle] {
  &:after {
    content: '+';
  }
}

#sidebar-1-toggle:checked ~ label[for=sidebar-1-toggle],
#sidebar-2-toggle:checked ~ label[for=sidebar-2-toggle] {
  &:after {
    content: '\2013';
  }
}

#sidebar-1-toggle:checked ~ .sidebar-1,
#sidebar-2-toggle:checked ~ .sidebar-2 {
  display: block;
  width: 20%;
}
Webpack Dev Server
For development, use npm run dev to launch the dev server, open the browser, watch for changes and build incrementally when changes are saved.
npm run dev
Now test the development server and file watch build. Edit the _toggle.scss file and comment @import "default-open";, uncomment @import "default-closed";. Save the file, check the terminal output and refresh the browser.
For production, cancel the dev task Ctrl + C and run the build.
npm run build
Source Code