
AEM Dispatcher CentOS Virtual Machine Setup
How to setup AEM Dispatcher on a CentOS Virtual Machine (VM) alongside Author and Publish instances. This solution gives an Adobe Experience Manager developer a complete end-to-end environment for local AEM development.
Topics Covered:
For this CentOS VM, I downloaded the Minimal ISO from centos.org/download. The ISO filename was CentOS-7-x86_64-Minimal-1810.iso at the time of this writing.
Create your VM using the Virtual Machine program you prefer. Popular options are VirtualBox, VMware or Hyper-V (Windows only).
Here are the virtual hardware settings I used when creating the VM.
- 4 GB Memory
- 32 GB max disk size
Minimum requirements for running Adobe Experience Manager per the AEM Technical Requirements page.
- 5 GB free disk space in the installation directory
- 2 GB memory
I’m not going to go over the entire CentOS 7 installation, however, I would like to highlight a couple setup items during the installation process. These items pertain to a local VM that is only accessible from within the host computer network.
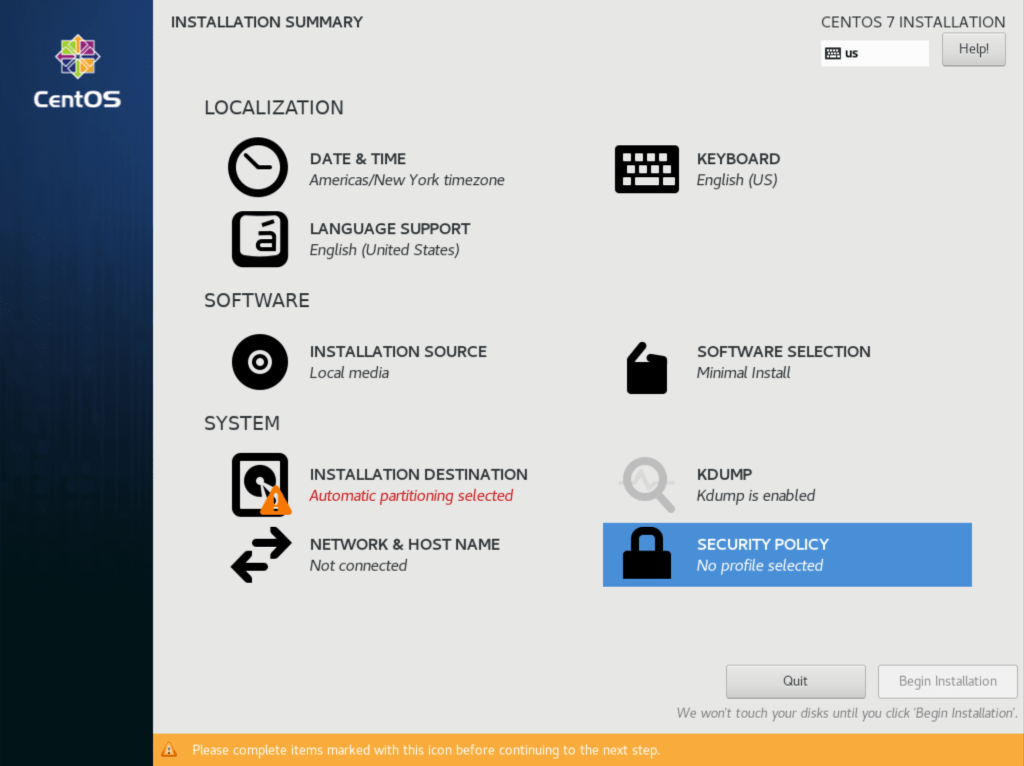
CentOS Installation Summary
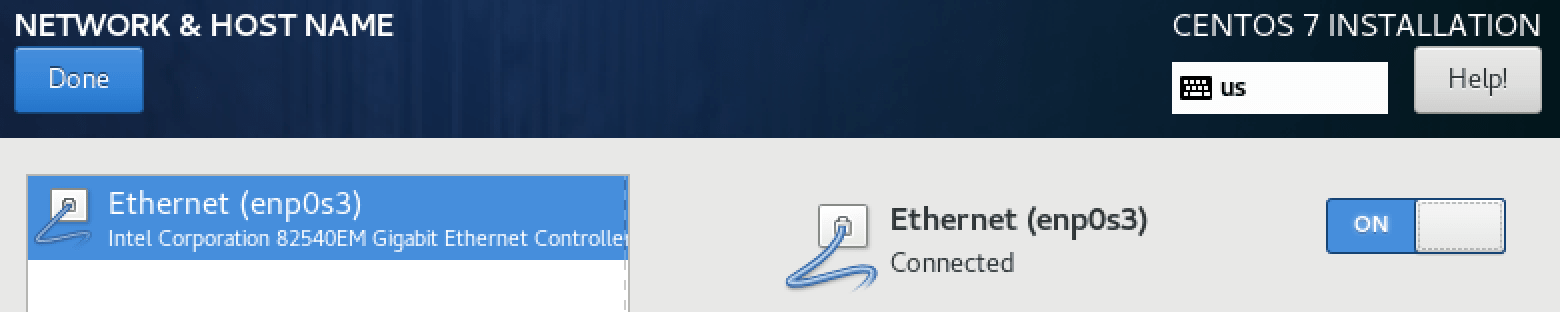
On the CentOS Installation Summary screen, select Network & Host Name. Enable networking by toggling ethernet to on.
Back on the Installation Summary screen, select Security Policy.
Security Policy selected
On the CentOS Installation Security Policy screen, toggle the security policy switch to off.
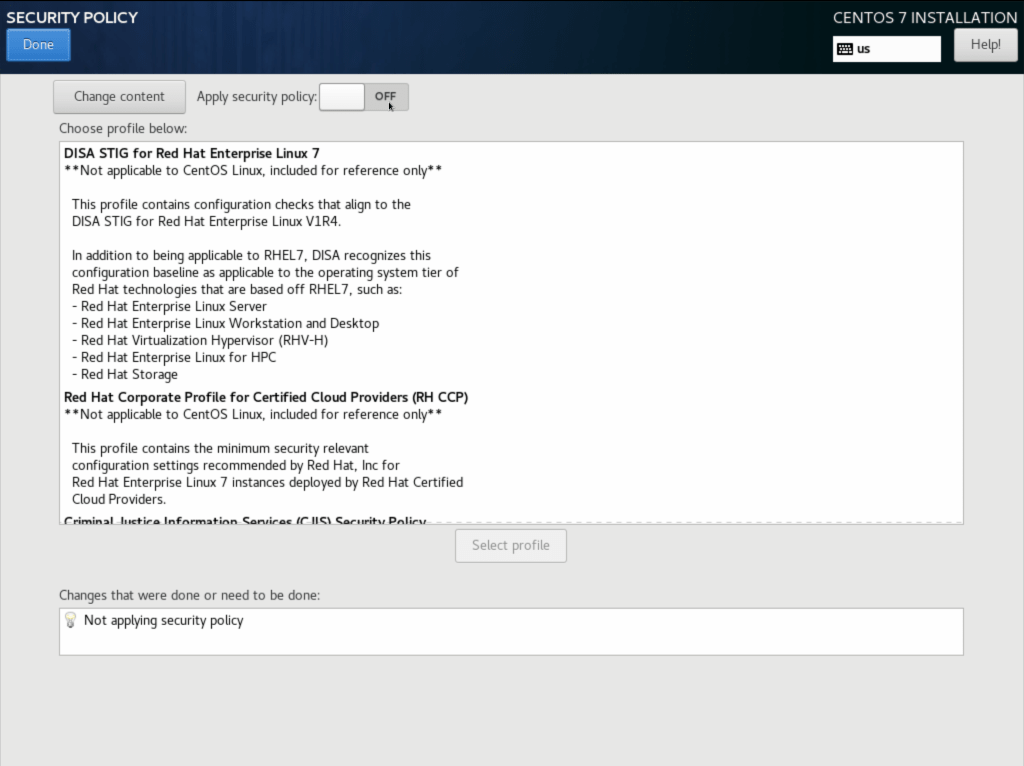
Security Policy - Apply security policy: Off
Additionally, I did not create a user and only set a root password.
These were done to alleviate potential access and permissions issues that I did not want to have to workaround.
The OpenSSH server was already up running on my new minimal CentOS VM. Obtain the IP that your network has assigned the VM and use the terminal to ssh into it for the remainder. e.g.,
ssh root@192.168.122.33
Update currently installed packages.
yum update
Firewall
Since we’re on a local VM, we do not need a firewall. Disable the firewall to prevent complications and free up any system resources under its consumption.
Check the status of the firewall.
firewall-cmd --state
Stop the firewalld service for the current session.
systemctl stop firewalld
Prevent the firewalld service from re-starting on system reboot.
systemctl disable firewalld
Java
Install Java.
yum install java-1.8.0-openjdk
Apache
Install Apache.
yum install httpd
Check if Apache is running.
systemctl status httpd
Start Apache as needed.
systemctl start httpd
Create a very basic Hello World index.html page in the /var/www/html directory to verify the Apache default web server is accessible in a web browser.
Install nano, an easy to use command line text editor
yum install nano
To transfer files between the host and VM, I’m using the FileZilla client on the host. A connection to the VM is set using the sftp ssh file transfer protocol.
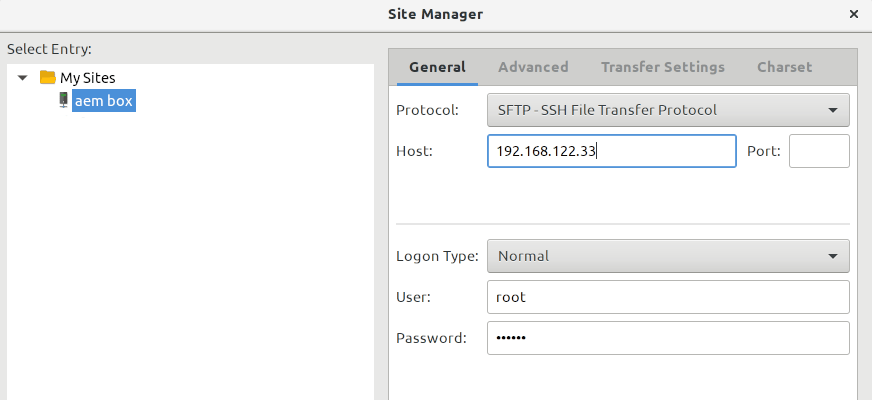
FileZilla client - Site Manager
Load the page in a web browser using the IP address of the VM. e.g., http://192.168.122.33
AEM
Adobe Experience Manager (AEM) opens a lot of files, so we need to max that limit.
Edit /etc/sysctl.conf e.g., nano /etc/sysctl.conf and add this line:
fs.file-max = 640000
Verify
sysctl -p
Edit /etc/security/limits.conf and add this line before the # End of file
* hard nofile 640000
Reload systemd manager configuration.
systemctl daemon-reload
Now we can proceed with the installation of the author, publish and dispatcher instances in the CentOS 7 server VM.
These steps presume that you have an AEM Quickstart jar and respective
license.propertiesfile from Adobe. If you’re an Adobe Solution Partner, you may visit the AEM Request Page to obtain the necessary files.
Create directory structure for aem author and publish instances.
mkdir -p /opt/aem/{author,publish}
Upload AEM Quickstart jar and license.properties files to /opt/aem/author and /opt/aem/publish folders. Set the port number by renaming the Quickstart jar files. e.g.,
cd /opt/aem/author
mv AEM_6.4_Quickstart.jar cq5-author-p4502.jar

cd /opt/aem/publish
mv AEM_6.4_Quickstart.jar cq5-publish-p4503.jar
Unpack the renamed jar files. e.g.,
cd /opt/aem/author
java -jar cq5-author-p4502.jar -unpack

cd /opt/aem/publish
java -jar cq5-publish-p4503.jar -unpack
Every AEM instance is an author instance by default. To configure the publish instance, set CQ_PORT=4503 and CQ_RUNMODE='publish' in the /opt/aem/publish/crx-quickstart/bin/start bash script. e.g.,
start
...

# TCP port used for stop and status scripts
if [ -z "$CQ_PORT" ]; then
    CQ_PORT=4503
fi

...

# runmode(s)
# will not be used if repository is already present
if [ -z "$CQ_RUNMODE" ]; then
    CQ_RUNMODE='publish'
fi
Start the publish instance for the first time
java -jar /opt/aem/publish/cq5-publish-p4503.jar -r publish
After a few minutes and everything has initialized, load the publish instance in a browser. e.g., http://192.168.122.33:4503
After the initial startup of the publish instance, use the stop and start bash scripts for stopping and starting the instances. e.g.,
bash /opt/aem/publish/crx-quickstart/bin/stop

bash /opt/aem/publish/crx-quickstart/bin/start
Start the author instance.
bash /opt/aem/author/crx-quickstart/bin/start
Depending on the amount of memory you have allocated to the VM, you may want to increase the max heap (
Xmx) size for the JVM in the start script. e.g., `CQ_JVM_OPTS='-server -Xmx2048m -XX:MaxPermSize=256M -Djava.awt.headless=true'
After a few minutes and everything has initialized, load the author instance in a browser. e.g., http://192.168.122.33:4502. The default username and password is admin.
Dispatcher
Disable SELinux (Security Enhanced Linux). If enabled, SELinux may cause some errors while running AEM Dispatcher.
Edit /etc/selinux/config
SELINUX=disabled
Verify with setsebool
/usr/sbin/setsebool httpd_can_network_connect true

# expected output
setsebool:  SELinux is disabled.
Get the Apache version.
httpd -version
Download Dispatcher for the correct version of Apache and CentOS Linux, e.g.,
# navigate to the root folder
cd /root

# create a dispatcher folder
mkdir dispatcher

# download into the dispatcher folder
curl -L https://www.adobeaemcloud.com/content/companies/public/adobe/dispatcher/dispatcher/_jcr_content/top/download_8/file.res/dispatcher-apache2.4-linux-x86-64-4.2.3.tar.gz -o dispatcher/dispatcher-apache2.4-linux-x86-64-4.2.3.tar.gz
Extract the tarball into the dispatcher directory, e.g.,
cd /root/dispatcher

tar -xvf dispatcher-apache2.4-linux-x86-64-4.2.3.tar.gz
Create a softlink of the DSO file in the modules directory of Apache, e.g.,
ln -s /root/dispatcher/dispatcher-apache2.4-4.2.3.so /etc/httpd/modules/mod_dispatcher.so
Copy `dispatcher.any` file into Apache conf folder.
cp /root/dispatcher/dispatcher.any /etc/httpd/conf/dispatcher.any
Edit the Apache configuration, /etc/httpd/conf/httpd.conf.
- Load module: load dispatcher_module on start-up
- Add dispatcher configuration entries
- SetHandler: activate dispatcher
- ModMimeUsePathInfo: modify the behavior of mod_mime
Insert the following code somewhere after Include conf.modules.d/*.conf. e.g., after last existing </IfModule>
httpd.conf
...

# AEM DISPATCHER
LoadModule dispatcher_module /etc/httpd/modules/mod_dispatcher.so

<IfModule disp_apache2.c>
    DispatcherConfig conf/dispatcher.any
    DispatcherLog logs/dispatcher.log
    DispatcherLogLevel 3
    DispatcherNoServerHeader 0
    DispatcherDeclineRoot 0
    DispatcherUseProcessedURL 0
    DispatcherPassError 0
    DispatcherKeepAliveTimeout 60

    RewriteEngine on
    RewriteRule ^/$ /content/we-retail.html [R]
</IfModule>

<Directory />
<IfModule disp_apache2.c>
    SetHandler dispatcher-handler
</IfModule>
Options FollowSymLinks
AllowOverride None
</Directory>
<Directory />
<IfModule disp_apache2.c>
    SetHandler dispatcher-handler
    ModMimeUsePathInfo On
</IfModule>
Options FollowSymLinks
AllowOverride None
</Directory>
The
RewriteRulein the configuration above simply redirects the web root to the we-retail content. For multiple sites, you can define virtual hosts. For more info, checkout the AEM Dispatcher Guide: Using Dispatcher with Multiple Domains.
Edit /etc/httpd/conf/dispatcher.any.
dispatcher.any
...

/virtualhosts {
    "*:80"
}
/renders {
    /rend01 {
        # Hostname or IP of the render
        /hostname "127.0.0.1"
        # Port of the render
        /port "4503”
    }
}
This configuration accepts all requests on port 80 and serves the pages provided by the publish instance on port 4503.
Restart Apache after configuration changes.
systemctl restart httpd
Load the dispatcher instance in a browser. e.g., http://192.168.122.33
AEM Service
These are the steps for using systemd to start AEM automatically when booting up the CentOS Virtual Machine.
Verify that the start and stop scripts in both author and publish crx-quickstart/bin directories work as expected. The service will be using them.
Create a folder for the service init scripts. e.g.,
mkdir -p /opt/aem/service
Next, in /opt/aem/service, create an aem-author and aem-publish init script using these as a reference:
Make the scripts executable. e.g.,
cd /opt/eam/service
chmod +x aem-author aem-publish
Test the scripts. e.g.,
/opt/aem/service/aem-author start
/opt/aem/service/aem-publish start

/opt/aem/service/aem-author stop
/opt/aem/service/aem-publish stop
If everything tests out okay, we’re ready to create the systemd service files for author and publish in /etc/systemd/system. e.g.,
aem-author.service
[Unit]
Description=Adobe Experience Manager Author

[Service]
Type=simple
ExecStart=/opt/aem/service/aem-author start
ExecStop=/opt/aem/service/aem-author stop
RemainAfterExit=yes

[Install]
WantedBy=multi-user.target
aem-publish.service
[Unit]
Description=Adobe Experience Manager Publish

[Service]
Type=simple
ExecStart=/opt/aem/service/aem-publish start
ExecStop=/opt/aem/service/aem-publish stop

[Install]
WantedBy=multi-user.target
Make them executable. e.g.,
cd /etc/systemd/system
chmod +x aem-author.service aem-publish.service
And finally, enable them. e.g.,
systemctl enable aem-author.service
systemctl enable aem-publish.service
On the next reboot of the VM, AEM author and publish should start as expected. e.g.,
shutdown -r now
Upgrade CentOS 7
If you would like to upgrade to the latest version.
-
Check for available updates
sudo yum check-update -
Clean the yum package manager. The yum package manager downloads listings and data which can be removed.
sudo yum clean all -
Reboot the server. This may help speed up the update process and potentially prevent any issues by clearing the caches and lists in the local yum repositories.
reboot -
Update CentOS. The system will prompt you to confirm the list of packages to install/update. If this is okay, enter
yto continue with the download and installation.sudo yum update -
Reboot the system and verify the CentOS version
cat /etc/redhat-release